This page offers different free photography tutorials.
In the future there will be more tutorials and photo techniques coming ...
English speaking website with lens reviews FF and APS-C
www.opticallimits.com/Monitor calibration
http://epaperpress.com/monitorcal/index.htmlI. Long Exposure ND Filter Tutorial
I. Long Exposure ND Filter Tutorial
Long exposure photography can be useful for:
- Seascape / Coastal photography with misty water effects
- Landscape photography with blurry sky effects
- Waterfalls / Rivers with silky smooth water flow
and many more
What do I need ?
A tripod is always required. Sturdy tripods are perfect to minimize wind effects and the camera mirror slap.
Wood and carbon tripods are highly recommended, but aluminium tripods have also their advantages.
If the tripod you use has a centre column, keep it down to minimize the vibration caused by wind and mirror slap.
The Mirror lock-up is another possibility to reduce the vibration of the mirror slap. Just check your user's manual where to find this function in your camera.
A remote shutter release is required to avoid vibration as well. Here you have also different options: A shutter release cable , wireless remote control ( Infra-red and Radio frequency ). I prefer short (to avoid them getting wet) cables. Infrared can sometimes be difficult to use if you have a lot of sun or it's very often not comfortable to release from behind the photo camera. RF wireless remote control has a great working range ( very often more than 10 metres or 30 feet). The shutter release can be done from different positions around the camera.
Now the essential question. What kind of ND filter do I have to use ? That's a difficult question. It depends what you want to do.
To receive misty water effects ( coastal or seascape photography ) 30 seconds and more are often necessary.
It depends on how rough the sea or the water surface is.
To get silky stream effects by waves on the beach, I recommend to photograph with a shutter speed of 1s to 3s when the sea is calm. If the ocean is moderately energetic, 1s to 1/10s. If the sea is really rough, a shutter speed of around 1/15s could be the right one to work with. Again there are no fixed rules for it and there are a lot of factors like the beach itself. Every beach is different. Just trip the shutter when a wave is approaching or receding. After a while, you will get a feeling when you have to release the shutter.
It's the same with blurry clouds on landscape or architecture photography. The filter you need depends on different factors like the speed of the moving clouds.
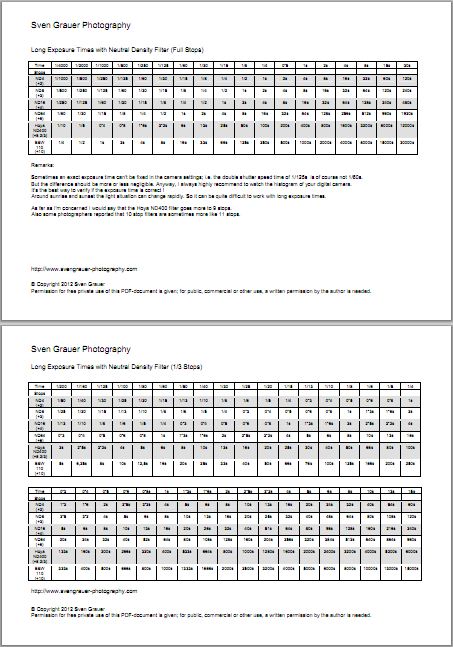
The following Neutral Density Exposure Time Table / Chart gives you an overview about the common ND Filters
There are two exposure time tables.The one on the first page is calculating with full stops.
On the second page you will find a table with 1/3 stops. So you are able to find a more exact exposure time.
Following ND Filter calculation the table offers ND4 ( 2Stops ), ND8 ( 3Stops ), ND16 ( 4Stops ), ND64 ( 6Stops ), ND400 ( Hoya ND400 - 8 2/3 Stops ) and ND1000 ( B&W 110 - 10 Stops ).
The downloadable PDF document is free for private use only !
Public, commercial or other use of this document is only allowed with the written permission of the author. To view the document you need to download and install a free PDF viewer like:
Adobe Acrobat Reader, PDF -XChange Viewer, Foxit PDF Reader ....
If you work with Neutral Density Filters you should do so by focusing first without filter. Then at the latest you should switch to manual focus ( otherwise the autofocus can maybe have a problem - it depends on the light and the filter you use ). Estimate the right exposure time. After that you can screw the demanded ND filter on. On my ND reference chart you can find the new exposure time.
To avoid light entering trough the viewfinder during the exposure time you can use a viewfinder cover.
The "BULB mode" allows you to keep the shutter open as long as you push down the shutter button. So you are in complete control of the exposure time. I photograph only with the "Manual" or the "BULB mode". The user manual of your camera helps you to get more information about the different modes you can use.
Low ISO settings are quite helpful to minimize noise during long exposures.
For further questions please don't hesitate to contact me.
II. Next Photography Tutorial
Wait and see .....
